

VT-x is name of CPU virtualisation technology by Intel. KVM is component of Linux kernel which makes use of VT-x. And QEMU is a user-space application which allows users to create virtual machines. QEMU makes use of KVM to achieve efficient virtualisation. In this article we will talk about how these three technologies work together. Don’t expect an in-depth exposition about all aspects here, although in future, I might follow this up with more focused posts about some specific parts.
Let’s first touch upon some theory before going into main discussion. Related to virtualisation is concept of emulation – in simple words, faking the hardware. When you use QEMU or VMWare to create a virtual machine that has ARM processor, but your host machine has an x86 processor, then QEMU or VMWare would emulate or fake ARM processor. When we talk about virtualisation we mean hardware assisted virtualisation where the VM’s processor matches host computer’s processor. Often conflated with virtualisation is an even more distinct concept of containerisation. Containerisation is mostly a software concept and it builds on top of operating system abstractions like process identifiers, file system and memory consumption limits. In this post we won’t discuss containers any more.
A typical VM set up looks like below:
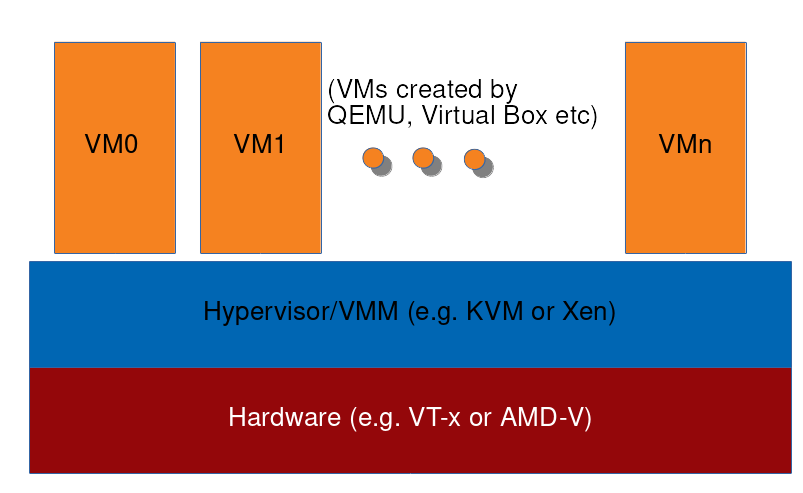
At the lowest level is hardware which supports virtualisation. Above it, hypervisor or virtual machine monitor (VMM). In case of KVM, this is actually Linux kernel which has KVM modules loaded into it. In other words, KVM is a set of kernel modules that when loaded into Linux kernel turn the kernel into hypervisor. Above the hypervisor, and in user space, sit virtualisation applications that end users directly interact with – QEMU, VMWare etc. These applications then create virtual machines which run their own operating systems, with cooperation from hypervisor.
Finally, there is “full” vs. “para” virtualisation dichotomy. Full virtualisation is when OS that is running inside a VM is exactly the same as would be running on real hardware. Paravirtualisation is when OS inside VM is aware that it is being virtualised and thus runs in a slightly modified way than it would on real hardware.
VT-x is CPU virtualisation for Intel 64 and IA-32 architecture. For Intel’s Itanium, there is VT-I. For I/O virtualisation there is VT-d. AMD also has its virtualisation technology called AMD-V. We will only concern ourselves with VT-x.
Under VT-x a CPU operates in one of two modes: root and non-root. These modes are orthogonal to real, protected, long etc, and also orthogonal to privilege rings (0-3). They form a new “plane” so to speak. Hypervisor runs in root mode and VMs run in non-root mode. When in non-root mode, CPU-bound code mostly executes in the same way as it would if running in root mode, which means that VM’s CPU-bound operations run mostly at native speed. However, it doesn’t have full freedom.
Privileged instructions form a subset of all available instructions on a CPU. These are instructions that can only be executed if the CPU is in higher privileged state, e.g. current privilege level (CPL) 0 (where CPL 3 is least privileged). A subset of these privileged instructions are what we can call “global state-changing” instructions – those which affect the overall state of CPU. Examples are those instructions which modify clock or interrupt registers, or write to control registers in a way that will change the operation of root mode. This smaller subset of sensitive instructions are what the non-root mode can’t execute.
Virtual Machine Extensions (VMX) are instructions that were added to facilitate VT-x. Let’s look at some of them to gain a better understanding of how VT-x works.
VMXON: Before this instruction is executed, there is no concept of root vs non-root modes. The CPU operates as if there was no virtualisation. VMXON must be executed in order to enter virtualisation. Immediately after VMXON, the CPU is in root mode.
VMXOFF: Converse of VMXON, VMXOFF exits virtualisation.
VMLAUNCH: Creates an instance of a VM and enters non-root mode. We will explain what we mean by “instance of VM” in a short while, when covering VMCS. For now think of it as a particular VM created inside QEMU or VMWare.
VMRESUME: Enters non-root mode for an existing VM instance.
When a VM attempts to execute an instruction that is prohibited in non-root mode, CPU immediately switches to root mode in a trap-like way. This is called a VM exit.
Let’s synthesise the above information. CPU starts in a normal mode, executes VMXON to start virtualisation in root mode, executes VMLAUNCH to create and enter non-root mode for a VM instance, VM instance runs its own code as if running natively until it attempts something that is prohibited, that causes a VM exit and a switch to root mode. Recall that the software running in root mode is hypervisor. Hypervisor takes action to deal with the reason for VM exit and then executes VMRESUME to re-enter non-root mode for that VM instance, which lets the VM instance resume its operation. This interaction between root and non-root mode is the essence of hardware virtualisation support.
Of course the above description leaves some gaps. For example, how does hypervisor know why VM exit happened? And what makes one VM instance different from another? This is where VMCS comes in. VMCS stands for Virtual Machine Control Structure. It is basically a 4KiB part of physical memory which contains information needed for the above process to work. This information includes reasons for VM exit as well as information unique to each VM instance so that when CPU is in non-root mode, it is the VMCS which determines which instance of VM it is running.
As you may know, in QEMU or VMWare, we can decide how many CPUs a particular VM will have. Each such CPU is called a virtual CPU or vCPU. For each vCPU there is one VMCS. This means that VMCS stores information on CPU-level granularity and not VM level. To read and write a particular VMCS, VMREAD and VMWRITE instructions are used. They effectively require root mode so only hypervisor can modify VMCS. Non-root VM can perform VMWRITE but not to the actual VMCS, but a “shadow” VMCS – something that doesn’t concern us immediately.
There are also instructions that operate on whole VMCS instances rather than individual VMCSs. These are used when switching between vCPUs, where a vCPU could belong to any VM instance. VMPTRLD is used to load the address of a VMCS and VMPTRST is used to store this address to a specified memory address. There can be many VMCS instances but only one is marked as current and active at any point. VMPTRLD marks a particular VMCS as active. Then, when VMRESUME is executed, the non-root mode VM uses that active VMCS instance to know which particular VM and vCPU it is executing as.
Here it’s worth noting that all the VMX instructions above require CPL level 0, so they can only be executed from inside the Linux kernel (or other OS kernel).
VMCS basically stores two types of information:
More specifically, VMCS is divided into six parts.
There are other aspects of hardware virtualisation support that we will conveniently gloss over in this post. Virtual to physical address conversion inside VM is done using a VT-x feature called Extended Page Tables (EPT). Translation Lookaside Buffer (TLB) is used to cache virtual to physical mappings in order to save page table lookups. TLB semantics also change to accommodate virtual machines. Advanced Programmable Interrupt Controller (APIC) on a real machine is responsible for managing interrupts. In VM this too is virtualised and there are virtual interrupts which can be controlled by one of the control fields in VMCS. I/O is a major part of any machine’s operations. Virtualising I/O is not covered by VT-x and is usually emulated in user space or accelerated by VT-d.
Kernel-based Virtual Machine (KVM) is a set of Linux kernel modules that when loaded, turn Linux kernel into hypervisor. Linux continues its normal operations as OS but also provides hypervisor facilities to user space. KVM modules can be grouped into two types: core module and machine specific modules. kvm.ko is the core module which is always needed. Depending on the host machine CPU, a machine specific module, like kvm-intel.ko or kvm-amd.ko will be needed. As you can guess, kvm-intel.ko uses the functionality we described above in VT-x section. It is KVM which executes VMLAUNCH/VMRESUME, sets up VMCS, deals with VM exits etc. Let’s also mention that AMD’s virtualisation technology AMD-V also has its own instructions and they are called Secure Virtual Machine (SVM). Under `arch/x86/kvm/` you will find files named `svm.c` and `vmx.c`. These contain code which deals with virtualisation facilities of AMD and Intel respectively.
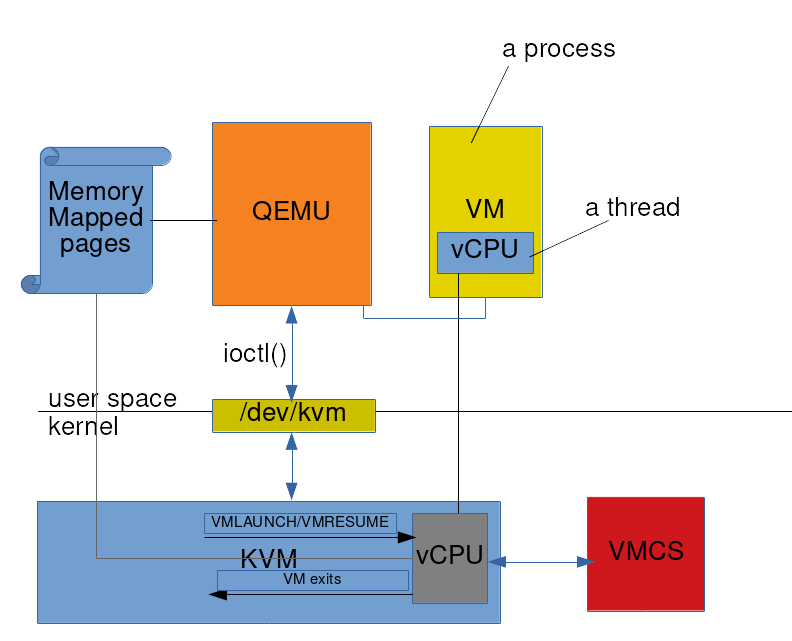
KVM interacts with user space – in our case QEMU – in two ways: through device file `/dev/kvm` and through memory mapped pages. Memory mapped pages are used for bulk transfer of data between QEMU and KVM. More specifically, there are two memory mapped pages per vCPU and they are used for high volume data transfer between QEMU and the VM in kernel.
`/dev/kvm` is the main API exposed by KVM. It supports a set of `ioctl`s which allow QEMU to manage VMs and interact with them. The lowest unit of virtualisation in KVM is a vCPU. Everything builds on top of it. The `/dev/kvm` API is a three-level hierarchy.
After creating vCPU QEMU continues interacting with it using the ioctls and memory mapped pages.
Quick Emulator (QEMU) is the only user space component we are considering in our VT-x/KVM/QEMU stack. With QEMU one can run a virtual machine with ARM or MIPS core but run on an Intel host. How is this possible? Basically QEMU has two modes: emulator and virtualiser. As an emulator, it can fake the hardware. So it can make itself look like a MIPS machine to the software running inside its VM. It does that through binary translation. QEMU comes with Tiny Code Generator (TCG). This can be thought if as a sort of high-level language VM, like JVM. It takes for instance, MIPS code, converts it to an intermediate bytecode which then gets executed on the host hardware.
The other mode of QEMU – as a virtualiser – is what achieves the type of virtualisation that we are discussing here. As virtualiser it gets help from KVM. It talks to KVM using ioctl’s as described above.
QEMU creates one process for every VM. For each vCPU, QEMU creates a thread. These are regular threads and they get scheduled by the OS like any other thread. As these threads get run time, QEMU creates impression of multiple CPUs for the software running inside its VM. Given QEMU’s roots in emulation, it can emulate I/O which is something that KVM may not fully support – take example of a VM with particular serial port on a host that doesn’t have it. Now, when software inside VM performs I/O, the VM exits to KVM. KVM looks at the reason and passes control to QEMU along with pointer to info about the I/O request. QEMU emulates the I/O device for that requests – thus fulfilling it for software inside VM – and passes control back to KVM. KVM executes a VMRESUME to let that VM proceed.
In the end, let us summarise the overall picture in a diagram: